Home » Gold price » Gold market
Church domes sparkling in the sun, majestic frames of icons, luxurious handles and linings on furniture - all these details are most often made using the technique of gilding the surface. Gold leaf, which is the thinnest sheet of metal, allows you to give any surface the appearance of an elegant and rich antique. How masterpieces are created from this unique material and what techniques exist for this will be discussed in this article.
Production of tinsel
The softness and malleability of pure gold allows the metal to be rolled into very thin sheets. Thanks to these physical properties of the metal, the sheets are obtained without cracks and breaks, that is, they are not damaged during the manufacturing process. The process of producing gold sheets begins with the casting of a bar. An ingot with dimensions of 20x5x1 cm is cast from metal, and then carefully rolled into a strip. The length of such a strip can reach 30 meters.
How to continue working with gold leaf? The strip is cut into squares, which are folded together, separated by paper sheets. Before the tinsel can be used for gilding work, this book is sent under a hammer that works about two thousand blows. Under the blows of the instrument, the sheets of tinsel become even thinner and form a kind of “cake”. A square is cut out of the “cake” and placed in a book.
The most important stage in the production of tinsel is beating the gold with a hammer. This procedure is very labor-intensive and difficult to perform. The hammer must strike so that the blows occur not only in a certain sequence, but also with the same force. Compliance with these requirements is mandatory, as it ensures the same thickness of the gold sheets over their entire area.
One book contains up to three hundred leaf sheets, each of which becomes 10 times larger after the beating procedure. For the most complete picture of the tinsel production process, it is recommended to watch the video, which reflects each stage of the production of thin gold sheets. Working with gold leaf largely depends on the quality of the sheets. If the sheets are made in accordance with all the rules, then the gilding of the product will also meet all quality requirements.
Gilding tinsel
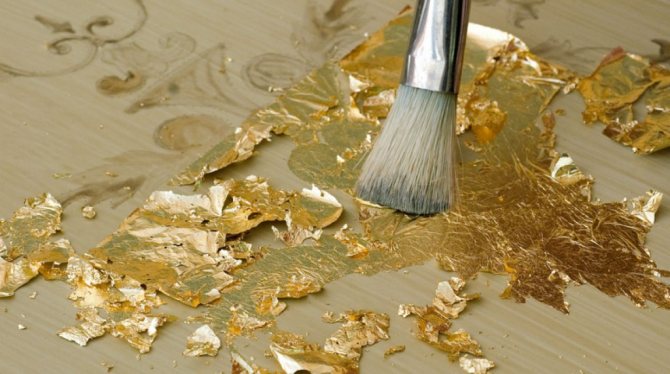
The technology of gilding with tinsel is based on one unusual property of gold: metal, rolled to a very small thickness, adheres to smooth surfaces at the molecular level. Coating a product with tinsel is a complex process, since working with the thinnest sheets of precious metal requires attention and accuracy. Casting a product from gold is much easier than covering the same product with tinsel.
This unusual property allows gold leaf to be used to decorate church domes, statues, fountain compositions, as well as pieces of furniture used to create a luxurious environment. The technology of applying material has changed throughout human history. Now tinsel is used as packaging for expensive sweets and even as an ingredient in coffee and cocktail drinks.

Among the methods of gilding with tinsel, experts distinguish two options: attaching the precious metal to polyment and to mordan. What is their difference? Polyment is a kind of base on which sheets of tinsel are attached. The composition of the polyment is based on clay, to which soap, white beeswax and whale oil are added in small quantities. The peculiarity of this method of gilding can be considered the final result: the surface takes on the appearance of real gold and looks as if it were made of metal. Attaching tinsel to polyment requires large financial and labor costs, so it is used in cases where it is necessary to treat a surface that is not exposed to the external environment. Most often, furniture is gilded this way.
What is a leaf coating on a mordan? This treatment of the product with gold allows you to give its surface a matte effect. To carry out the procedure, materials based on vegetable oils are used; Mordan varnish itself is prepared from flax and hemp oil with the addition of special components. In this case, treating the surface with tinsel is easier and faster. Mounting on the face allows you to decorate a variety of surfaces, including wood, plaster, and marble.
Before gilding the face, the surface of the product is primed with cinnabar and then wiped with cloth to remove irregularities. The prepared part is covered with mordan and dried for the required time. Depending on the variety of Mordan, drying can last from several hours to a whole day. Before applying the tinsel, the master checks the surface for “tack-free” conditions. It is very important here not to dry the mordan completely, since gold will not stick well to a dry surface. Undried mordan is also not suitable for gilding with gold leaf, since the sheets of material will sink in it. Considering the value of gold, all work should be carried out strictly according to technology and very carefully.
Simplified technology
The process of applying gold leaf to a surface can be represented as the following algorithm. Three layers of acrylic primer are applied to the product, and the first layer should be more liquid than all the others. This is necessary in order to saturate the surface. The first and second layers are dried for an hour, after applying the third layer the product is left to dry for about 8 hours.
The dried surface is sanded using abrasive paper, P240 or P400 paper is suitable. Then we apply shellac varnish to the product with a brush, dry it and sand it again, but with P600 marking paper. After all the preparatory procedures, the part is treated with Mordan and dried to the required level of stickiness.
After the mordan has dried to the required level of stickiness, gold leaf can be applied. The material is applied and pressed with a brush to avoid shifting. After a day, the product can be additionally polished with cotton, which will not damage the gold-plated surface. If you have all the components, this procedure for applying gold plating can be carried out at home.
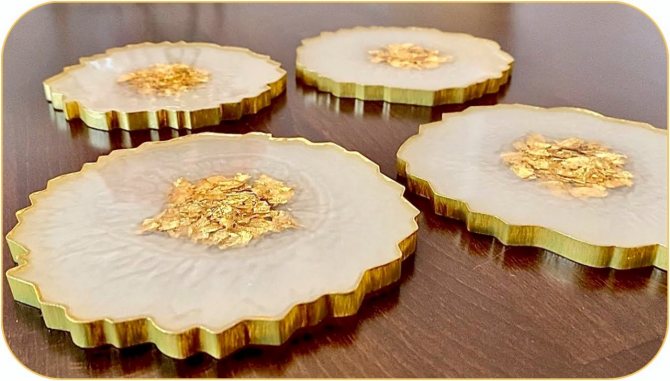
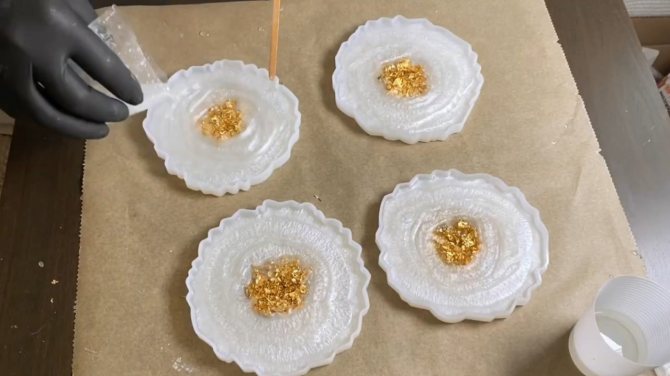
DIY epoxy resin coasters inlaid with gold leaf
Hello, dear readers and DIYers!
In this article, the author of the YouTube channel “Damir Z” will tell you how you can make very beautiful interior items - stands made of epoxy resin with the addition of gold leaf.
Such homemade products are very simple to make and can be easily repeated at home.
Materials needed for homemade products. Important point!
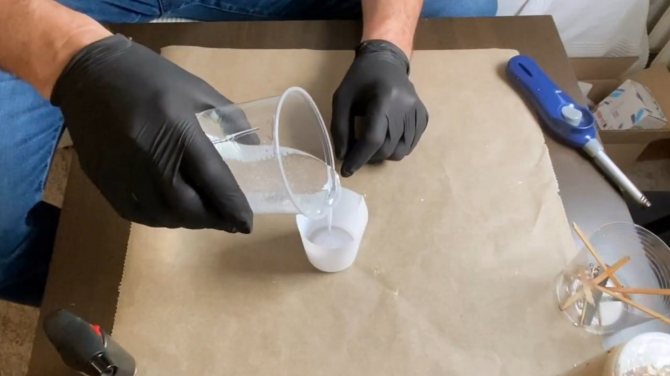
Ad blockers have recently been rejecting clicks on the links provided. It is recommended to disable them for this site. — Synthetic casting epoxy resin — Gold leaf — Silicone molds for stands option 1, option 2 — Dyes for casting epoxy resin — Pearlescent dye (metallic) for casting epoxy resin. Manufacturing process. The first and very important stage of working with two-component casting epoxy resin is preparing the composition. It is necessary to thoroughly mix both components of the resin with each other in strictly defined proportions, for which it is best to use precise electronic scales.
It is advisable to mix the components first in one plastic glass, and then pour the composition into another, stirring again for a couple of minutes.
The author divides the finished transparent composition into two parts.
Silicone injection molds are placed on a table covered with paper or film.
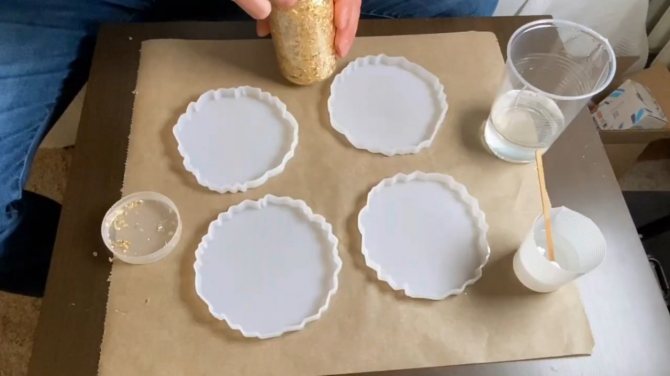
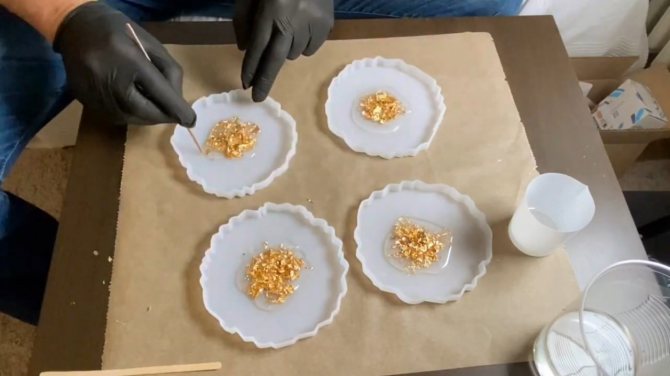
A very effective additive that defines the appearance of products is gold leaf. This foil comes in different shades - “copper”, silver, etc.
Slightly crumpled petals are placed in the central part of the forms. It is better to work with such foil using tweezers - it easily sticks to your hands and surfaces.

The master pours a thin stream of transparent composition onto each of the formed piles of foil. All pieces of foil should be covered with resin. Also, do not allow the composition to spread onto the rest of the surface.
White pearlescent pigment is added to the second part of the transparent composition and mixed thoroughly.
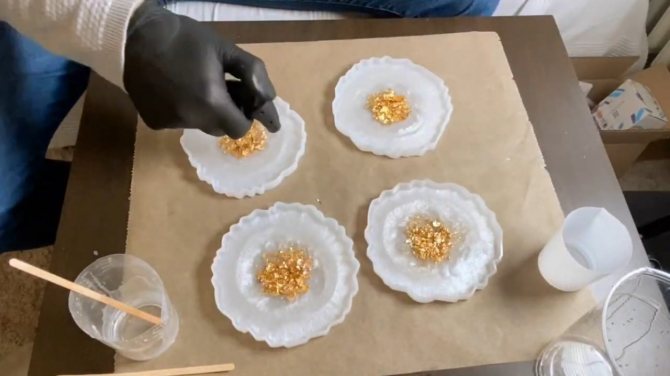
The pearlescent composition is once again added along the perimeter. The pattern of stains can be corrected with a toothpick.
The remaining transparent composition is added to the centers last. This is how the middle “opens up”. If bubbles appear again, you can neutralize them with a gas burner, or use a special aerosol (it has the same effect, but it is not cheap).

While the paint dries, the author places the stand on a plastic cup - this way the painted edges will not touch anything. Of course, all these operations must be performed in clean rooms where there is little dust. Surprisingly, such a room is the bathroom.

If you look closely, you can clearly see the difference between the mother-of-pearl pattern on the bottom and the surface. Small edges inevitably form on top near the edges. If desired, they can be removed by a grinder, followed by polishing steps.
Tools used by the author. — Precise electronic scales — Gas torch, brush, sticks — Grinding machine — Large store of tools, molds, pigments, dyes for working with casting resin.
Good mood, good health, and interesting ideas to everyone! Subscribe to the telegram channel
site so as not to miss new articles.
The author's video can be found here.
Source
Become the author of the site, publish your own articles, descriptions of homemade products and pay for the text. Read more here.
Modern technologies
The technology of gilding with gold leaf has undergone some changes throughout the history of using this material for surface finishing. The essence of the technology for producing tinsel sheets remains the same: a bar of precious metal is rolled into strips, cut into squares, the squares are put into a book and sent under the hammer. New developments make it possible to achieve sheets that are much thinner than those that were produced before. The task of the craftsmen is simplified by the use of computer technology.
Now gold leaf is practically not produced by hand; outdated technologies are a thing of the past. The process of obtaining thin leaf sheets today is completely automated, everything is done by machine. The electric hammer is configured for both the initial beating of sheets and the subsequent processing of precious metal to a minimum thickness. The casings of bovine intestines, which used to be used to wrap tinsel sheets, are also no longer used. Instead, modern plastic forms are used.
In Russia, the production of tinsel is carried out by a non-ferrous alloys plant located in Moscow. There are also private companies producing gold leaf, but their production volumes of material for mechanical gilding are not significant.
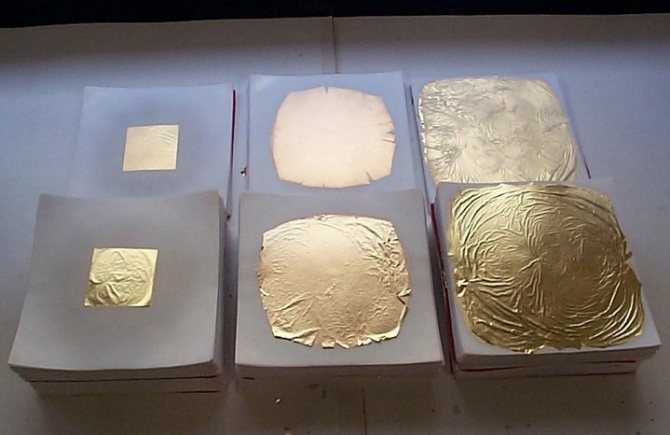
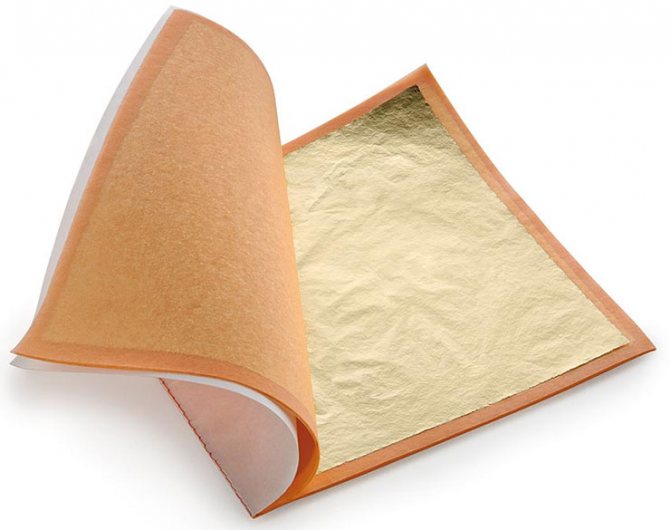
To understand what tinsel looks like, just imagine a very thin sheet of foil up to 1.5 microns thick. According to domestic standards, tinsel is produced in square sheets with a side of 91.5 mm. The sheets are laid out in books, the separator between the sheets is tissue paper. Books can consist of 10 or 60 leaf sheets.
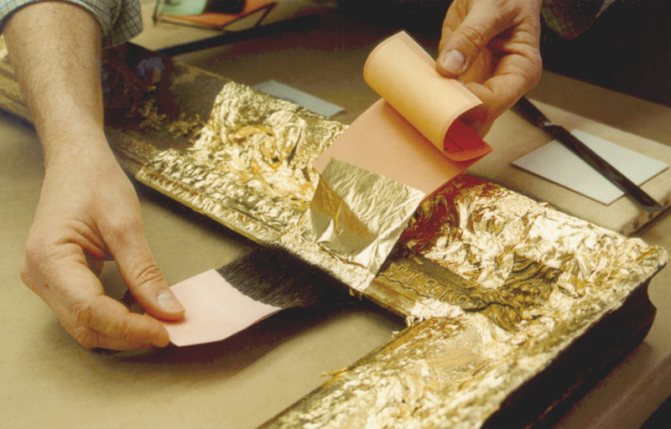
In order to imagine how gold leaf should be applied, it is recommended to watch a video accompanied by explanations from the master. Experts distinguish two types of gold leaf: free and transfer. Depending on the type of tinsel, there are differences in working with the material. Free gold is taken out of the book and placed on the pillow, and transfer gold is initially glued to a sheet in the book.
Features of leaf foil
The name of the material comes from the ancient Russian word “susal”, which translated into modern language means “face”. They covered the external (front) parts of objects, which gave them a particularly luxurious and rich look.
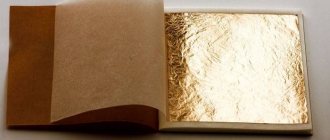
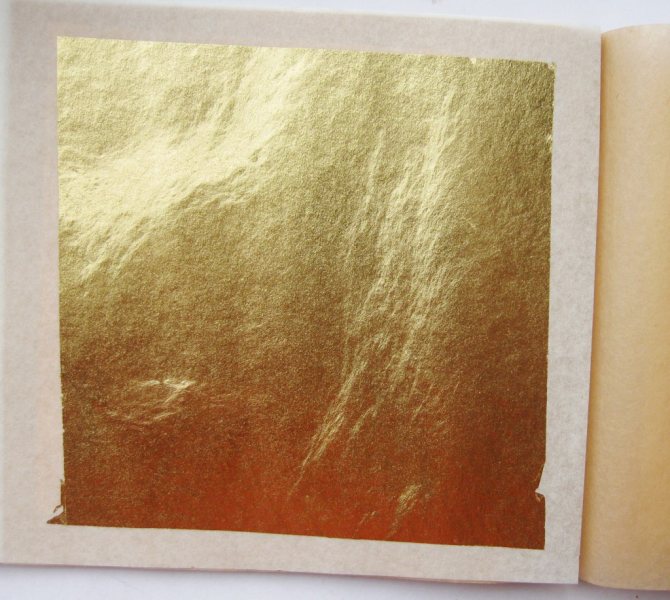
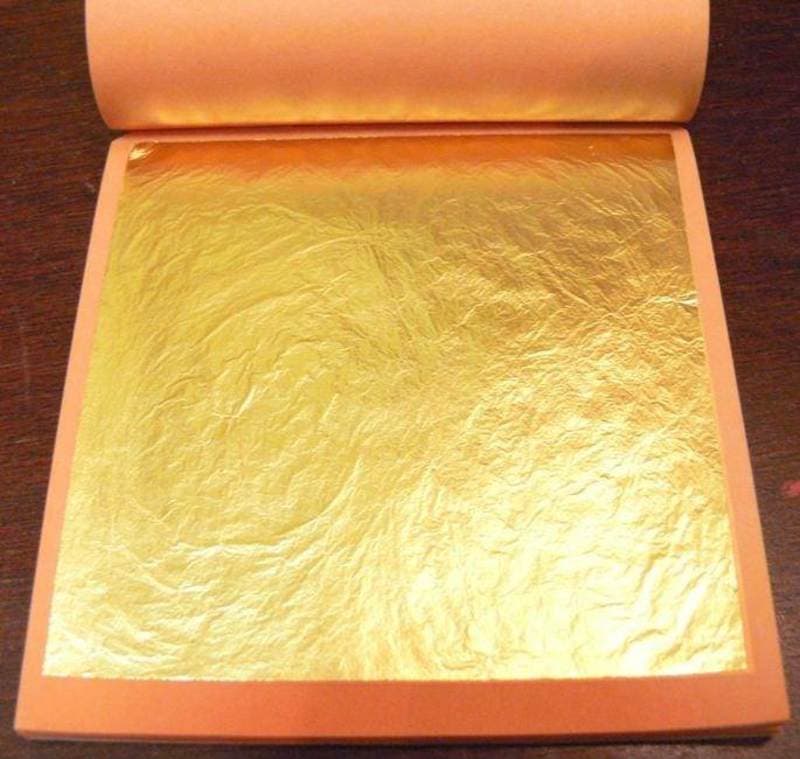
Not everyone knows what gold leaf is. The definition of its composition is as follows: these are the thinnest gold sheets with a thickness of 0.1 to 0.25 microns (1 micron = 0.001 mm). They are usually sold sewn into little books, the sheets of which are covered with the finest silk or tissue paper. You cannot handle these products with your hands, as they easily break and tear.
As a rule, 960 gold is used to make tinsel. But due to the low strength of the precious metal, it is often used in alloy with other materials. The composition of gold leaf may include:
- copper;
- silver;
- nickel;
- cadmium;
- zinc.
Depending on the additives, the material may have a red, yellow, green and white tint. There are two standards for making tinsel:
- Russian. The book measures 91.5 x 91.5 mm. It contains 60 pages separated by thin paper. Its weight is from 1 to 5.5 g.
- European. The book consists of 25 sheets measuring 80x80 mm.
There is another form of leaf leaf - fixed or transfer. The thinnest layers of gold are attached to wax paper and stitched into a book. The main feature of foil is its ability to adhere to any surface at the molecular level. Transfer gold is attached like stickers: the gold part is applied to the surface to be treated and pressed down. After some time, the silk paper is removed, and the gold remains on the surface. It is used to decorate smooth surfaces treated with a special adhesive.
Working with gold leaf in loose sheets is more difficult. They are peeled off from the paper with special tools, and then attached to the workpiece with a brush with natural bristles. This type of foil can be applied to objects of any shape.
How much gold leaf costs depends on its composition and type. Thus, the price of transfer foil is lower than that of free foil.